

I have wanted to blog about a Raspberry-Coconut Cake for a long time. I love both flavors very much. Since frozen raspberries are available all year round, a suitable recipe for my new silicone mold was quickly created. And finally, I am introducing you to one of my favorite glazes: The Glaçage flamboyant fuchsia. The last recipe for the “Fleurs de prunier” was a classic artisanal recipe, and I was delighted that these handcrafted recipes are always so well received by you. Especially because I really enjoy implementing such recipes. But for a little variety and for lovers of mousse cakes and unusual silicone molds, this time there is a recipe for a glittering Raspberry-Coconut Cake that will surely make many women and girls’ eyes light up. As far as I’m concerned, men & boys are welcome to join in too 😉
What does the recipe for the Raspberry-Coconut Cake consist of?
I chose a Raspberry Yogurt Mousse as the base. Hidden inside are a few raspberries, and the base serves as a ring of Pâte sablée (shortcrust) with vanilla and almonds. The bubble insert is enclosed with a Mousse à la noix de coco (Coconut Mousse). Sitting on the entremets is a Bubble Crown made of soft Vanilla Crémeux with a bit of Velvet Spray in white. But the star is the pink Lipgloss Glaze (Glaçage flamboyant fuchsia). A glaze with raspberry candy flavor, edible silver glitter, and edible interference pigments.
What should be noted for the Raspberry-Coconut Cake recipe?
There are a few things to keep in mind for this Raspberry-Coconut Cake recipe:
- Since you only need a small amount of Pâte sucrée, I recommend making the basic recipe for Pâte sucrée a few days in advance and freezing pre-portioned amounts. You need less than 150g of dough for the recipe, and at some point, the dollhouse quantities in the recipe become ridiculous 😉
- It might be important to mention that I use the Bubble Crown Kit somewhat differently or combine it differently than suggested by Silikomart. I have a Bubble Crown on top of the entremets, but I also packed the Bubble Crown inside the Raspberry-Coconut Cake. Since space is quite tight in the mold, you have to work super precisely when inserting the inlay and coat the edges of the mold generously with the Coconut Mousse beforehand. This ensures that white mousse is everywhere and the insert doesn’t shine through to the outside.
- I have a small special feature in the recipe today. I use Pectin NH or Pectin Nappage for the raspberry glaze. Fruit glazes simply succeed best with this. The processing is more comfortable, the pectin doesn’t swallow as much flavor from the raspberry puree as gelatin does, and leftovers can always be reheated, e.g., to glaze smaller tartlets. Check out the sources, where you will find suppliers for Pectin NH from Louis François and Sosa. Also, a small tip: it is veggie (vegetarian)!
- Keep your eyes open when buying glitter: I also have a recommendation regarding the glitter and interference pigments in the glaze recipe. Please, please do not buy rubbish! If the packaging says, for example, that the glitter or glitter pigments or powder are not suitable for consumption, then it might be the finest shredded PVC… No one dies if they eat it, but I wouldn’t want such cr*p sprinkled on or in my food. The disadvantage of extravagant glitter pigments that are approved for use in food is often the price. They simply cost a bit more. Furthermore, these TOP qualities (in the right dosage) do not or barely affect the taste and mouthfeel. Always study the description and ingredient list carefully and don’t go for just any random glitter. But that applies elsewhere in life too!
Note / Request:
You know I love you all and always try to offer the right alternative for everyone. But today I have to be strict. The recipe for the glaze stays as it is. I cannot offer you a substitute for the Pectin NH 100 g* or Nappage. Neither another manufacturer nor gelatin or other binders and thickeners. I work with professional materials, ingredients, and additives. I would like to design special recipes so that they meet my standards. And it is simply not possible for me time-wise to always test an alternative for everything. Some recipes have specific properties and ingredients that are difficult to replace without sacrificing quality, taste, or processing. Alternatively, you can use a mirror glaze, such as from this recipe. You can color this, but the glitter will not come out well or at all, as the milk components cover the glitter pigments.
Recipe for Raspberry-Coconut Cake with Glitter Glaze »Entremets Couronne de bulles«
Ingredients for 8 people
Important Baking Tools
- Kitchen machine or hand mixer
- Silikomart Kit Bubble Crown*
- Large offset spatula* and
- Small offset spatulas*
- Cooling/Glazing rack*
- Optional: Small star cutters*
- Pectin NH 100 g*
Purée de framboises (Raspberry Puree)
- 350 g frozen or fresh raspberries OR 185 g Raspberry puree*
Pâte sucrée (Sweet Shortcrust)
- 150 g Pâte sucrée according to the Basic recipe for Pâte sucrée
Mousse de framboises au yaourt (Raspberry Yogurt Mousse)
- 40 g Greek yogurt 10% fat
- 65 g Raspberry puree
- 25 g Sugar
- 1.5 sheets Gelatin
- 110 g Heavy cream
- approx. 40 g Frozen raspberries
Glaçage flamboyant fuchsia (Fuchsia Glitter Glaze)
- 500 g Water
- 250 g Sugar
- 20 g Pectin NH (Louis François or Sosa see sources)
- 20 g Lemon juice
- 120 g Raspberry puree
- 2 g Pearl luster powder Silver Glitter*
- 2 g Interference pigments Blue*
- Optional: some Pink gel color*
Mousse à la noix de coco (Coconut Mousse)
- 190 g Coconut milk (canned)
- 30 g Sugar
- 40 g Egg yolks
- 20 g Cornstarch (Maizena)
- 20 g Heavy cream (to mix)
- 1.5 sheets Gelatin, standard
- 10 g Desiccated coconut/flakes
- 170 g Heavy cream (to whip)
- 5 g Sugar
Crémeux vanille (Vanilla Creamy)
- 90 g Whole milk 3.5%
- 70 g Heavy cream
- 40 g Egg yolks
- 10 g Sugar
- 1/2 Vanilla pod
- 2 sheets Gelatin
- 160 g White chocolate
Garnish
- Velvet Spray White*
- e.g. Gum paste*, fondant, or chocolate for the stars
- Pearl luster powder Silver* to dust the stars
Preparation
Step 1
Prepare the Pâte sucrée (see Basic recipe for Pâte sucrée).
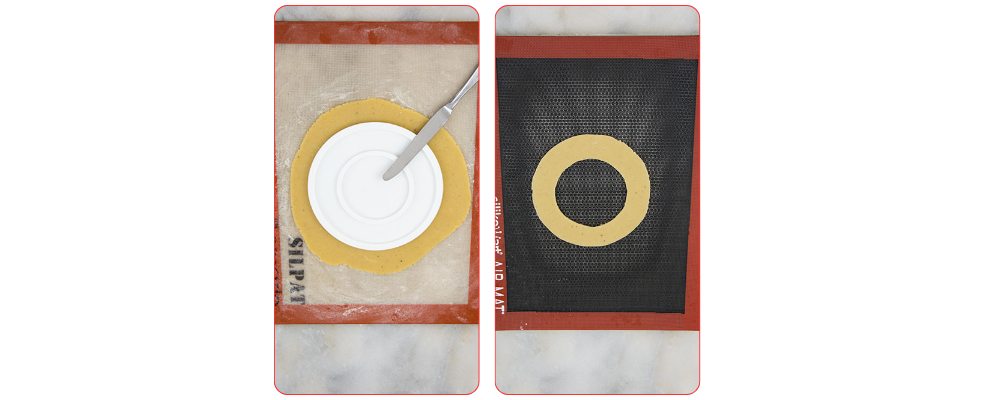
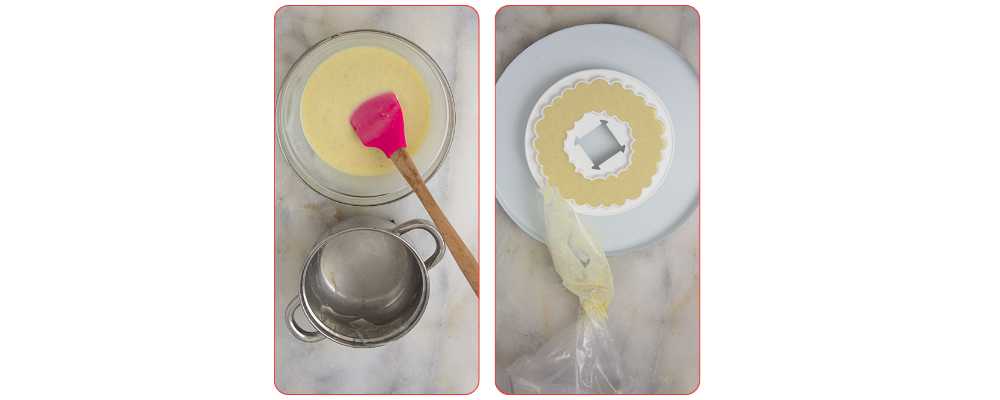
Roll out 150g of Pâte sucrée to 3mm thickness and use the mold for the insert from the set to cut a ring for the base. To do this, place the insert with the open side up on the dough and trace along the edges of the ring with the BLUNT part of a knife (1) to transfer an impression onto the dough. Then cut out the dough, remove excess dough, and place it along with the mat in the freezer for 10 minutes. Then bake the dough ring (2) in an oven preheated to 175°C for 8 – 10 minutes until golden brown.
 Step 2
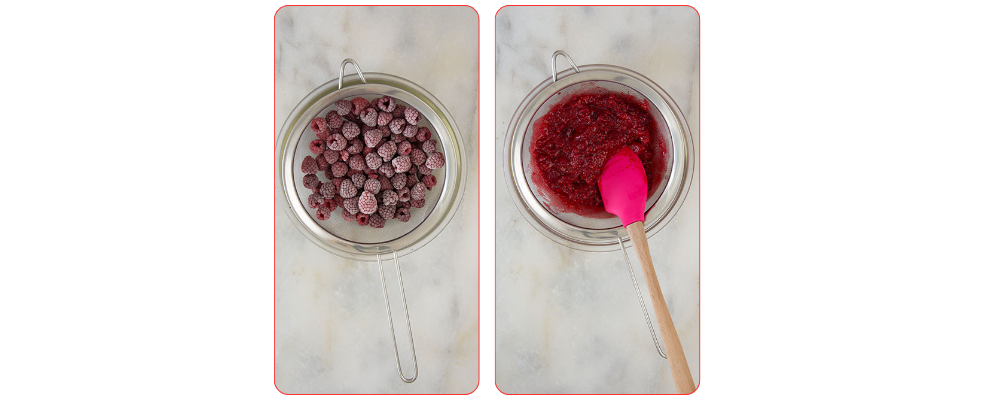
Prepare the Raspberry Puree (Purée de framboises) for the Mousse de framboises au yaourt and the Glaçage. Defrost 350g of frozen raspberries (3) (microwave) and press through a fine sieve (4). Then weigh out the required amounts for the recipes and keep ready.
 Step 3
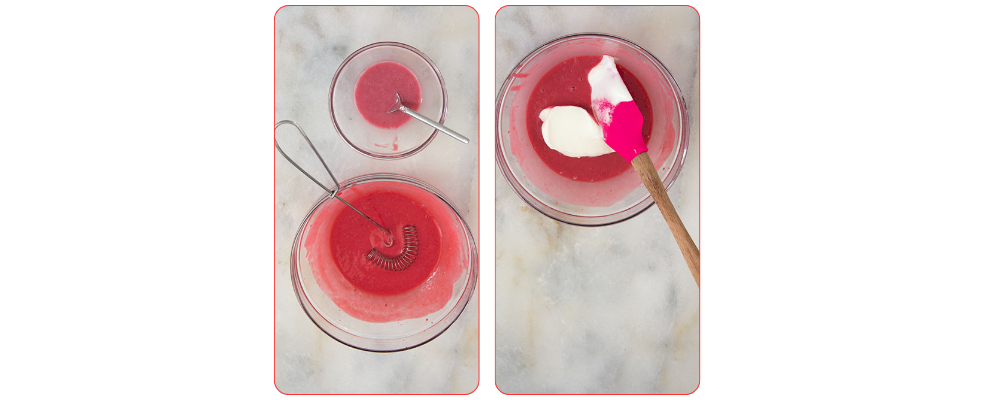
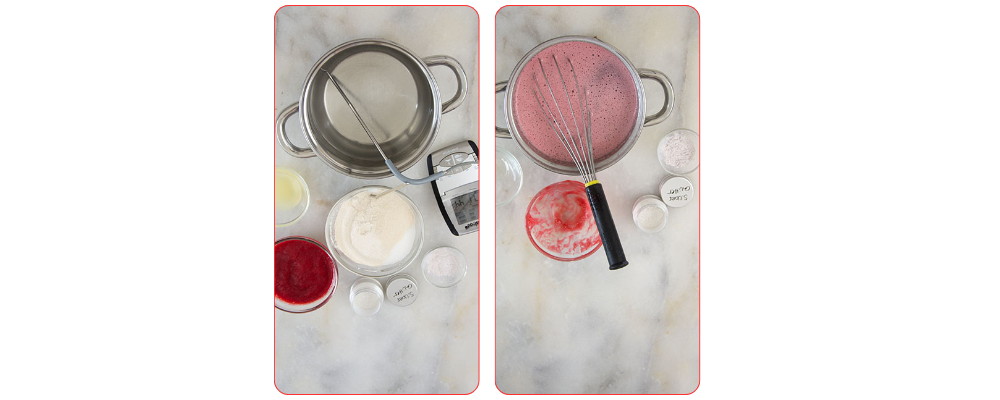
For the Mousse de framboises au yaourt, first soak the gelatin in cold water. Meanwhile, whip the cream until 3/4 stiff (not completely stiff) and keep ready. Then mix the yogurt and the raspberry puree with the sugar and warm to approx. 24°C. Squeeze out the gelatin and carefully warm in a small pot (or in the microwave) until melted. Add 2 tbsp of the raspberry-yogurt mixture to the gelatin (5) and mix. Then add the gelatin mixture slowly and with constant stirring to the rest of the raspberry yogurt and mix thoroughly. Fold in the whipped cream (6) with a spatula in 2 – 3 portions.
 Step 4
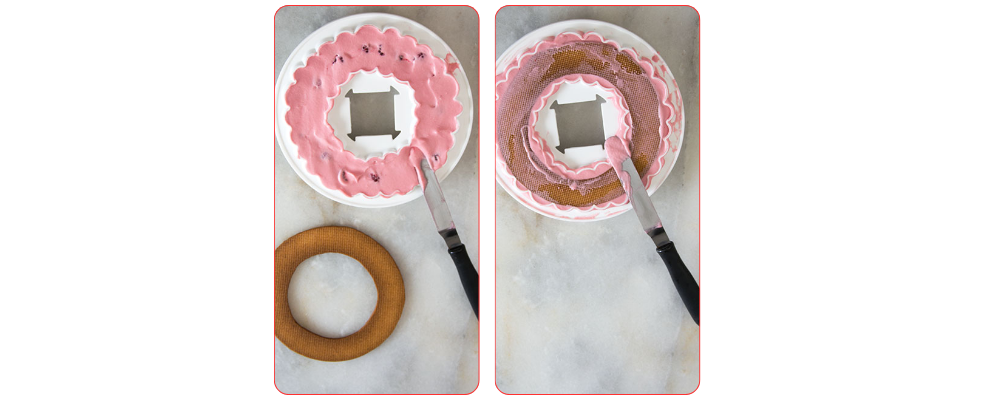
Fill the mousse into a piping bag and fill the “Bubble Crown” with the Raspberry Mousse (7). Work very thoroughly and pay special attention to ensuring the edges are well coated with mousse. Press the frozen raspberries into the mousse, cover with the Pâte sablée ring, and smooth everything (8) out. Place the mold in the freezer for approx. 2 – 3 hours.
 Step 5
For the Glaçage flamboyant fuchsia, mix the pectin with the sugar. Then heat the water (9) in a pot (the pot should hold at least 3 liters) to 40 – 45°C. Sprinkle the pectin mixture into the warm water while stirring constantly. When everything has dissolved without lumps, bring the pot contents to a boil and let it boil rapidly for 3 minutes. The temperature will rise to approx. 102°C. Remove the pot from the heat and stir in the lemon juice. The liquid will thicken slightly. Then stir in the raspberry puree (10) and optionally color the glaze with some pink gel color.
 Step 6
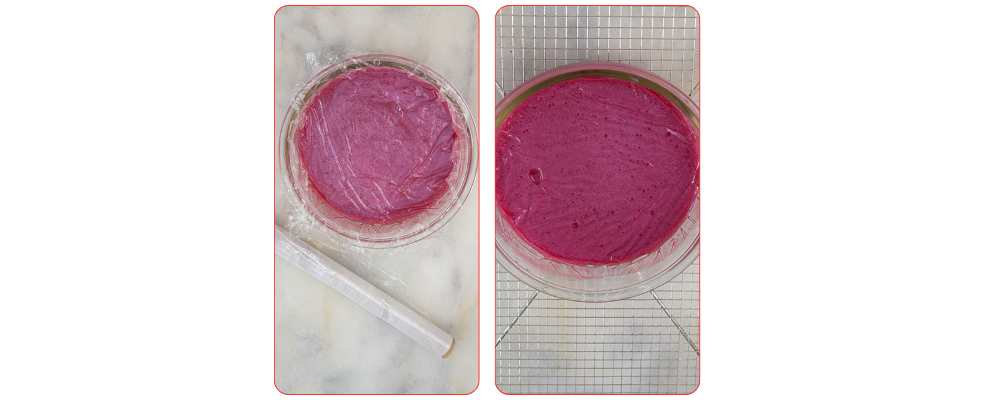
Pour everything into a bowl and thoroughly stir in the edible glitter and pigments. Cover the glaze with cling film in contact with the surface (11), let cool slightly, and place in the fridge overnight. The glaze can also be used directly when it reaches 35 – 40°C. However, it is even better to work with (12) after a night in the fridge.
 Step 7
When the “Bubble Insert” with the raspberry mousse is frozen solid, prepare the Mousse à la noix de coco (Coconut Mousse).
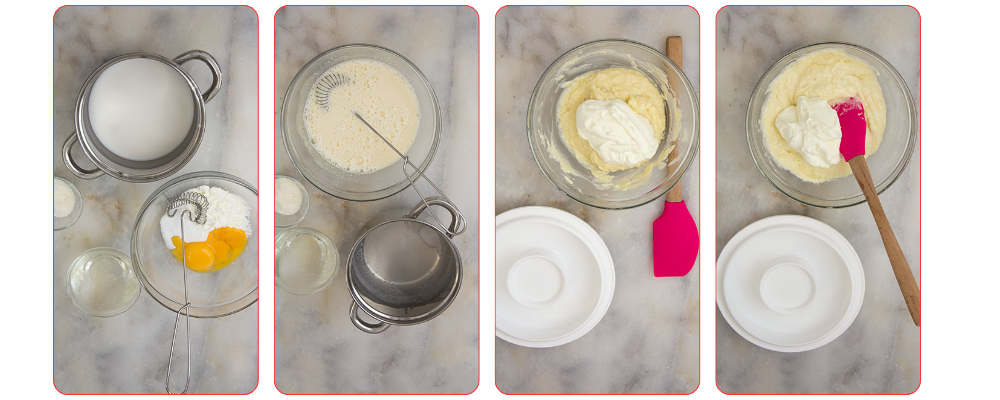
Mix the egg yolks (13) with sugar and cornstarch in a bowl until lump-free. Then bring the well-stirred coconut milk to a boil in a small pot and slowly add it to the egg yolk mixture while stirring constantly (to temper). Pour everything back into the pot (14) and bring to a boil once while stirring. Then transfer to a bowl and thoroughly stir in the squeezed gelatin. Then stir in 20g of cream and the coconut flakes. Let cool to 30°C, stirring occasionally. Whip the cold cream (170g) with 5g sugar until stiff and fold in three portions (15 + 16). Transfer to a piping bag for further use.
 Step 8
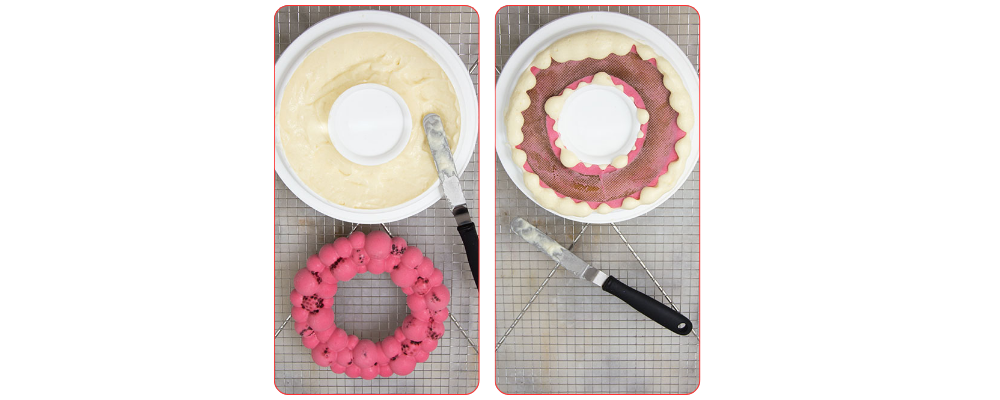
Fill the Coconut Mousse into the base mold. Work cleanly and pay special attention to ensuring the edges (17) are well coated with mousse. Then remove the “Bubble crown Insert” from the silicone mold and place it into the mousse. Press down slightly to create a smooth finish. Smooth off any mousse oozing out (18) with a small palette knife. Then place the mold in the freezer for 6 hours, or better, overnight.
 Step 9
Fill the Bubble Crown one more time. To do this, make the Crémeux vanille. Soak gelatin in cold water for approx. 5 minutes. Then cook a Crème anglaise. Mix egg yolks with sugar in a bowl. Bring milk, cream, and vanilla to a boil in a small pot (19). Then add very slowly and with constant stirring to the egg yolks. Pour everything back into the pot and heat to 82 – 84°C while stirring constantly. Thoroughly stir in gelatin and pour the Crème anglaise in 2 portions (20) over the chocolate. Stir until a homogeneous emulsion (21) is formed, but do not incorporate air. Put the Crémeux into a piping bag and fill the Bubble Crown (22) with it. Place in the freezer for approx. 2 hours.
 Tip:
Tip:
It is best to always place silicone molds on a board (especially with very liquid fillings) before filling, which fits into the freezer. This prevents spilling or slipping during transport to the freezer.
 Step 10
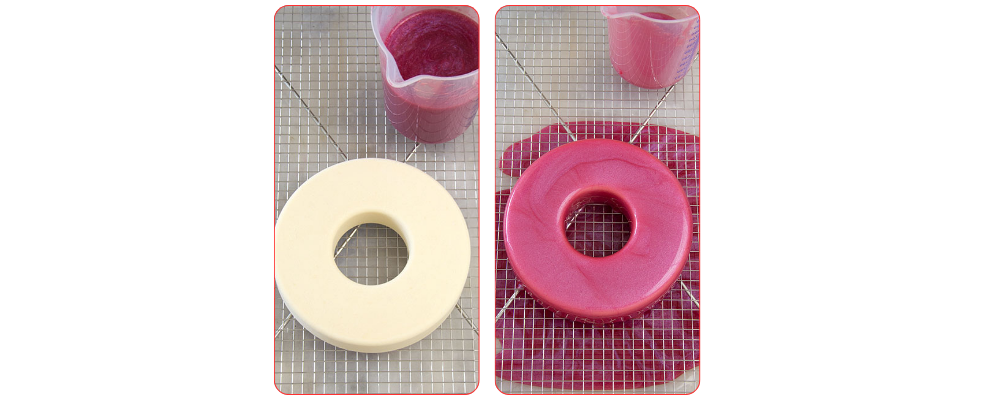
Slowly warm the Glaçage flamboyant fuchsia to 35 – 40°C (water bath or carefully in the microwave) and stir well. Then take the Raspberry-Coconut Cake out of the freezer (23) and place it on a wire rack. Please place a plastic sheet, cling film, or a clean baking tray underneath. Immediately pour the glaze (24) evenly and very quickly over it (over a praline or cake rack). If necessary, immediately swipe lightly over the glaze with a large palette knife. Swipe or cut away drips at the bottom edge inwards with a palette knife. Immediately place the Raspberry-Coconut Cake on a cake board or gold board and let thaw in the fridge for approx. 3 hours.
 Step 11
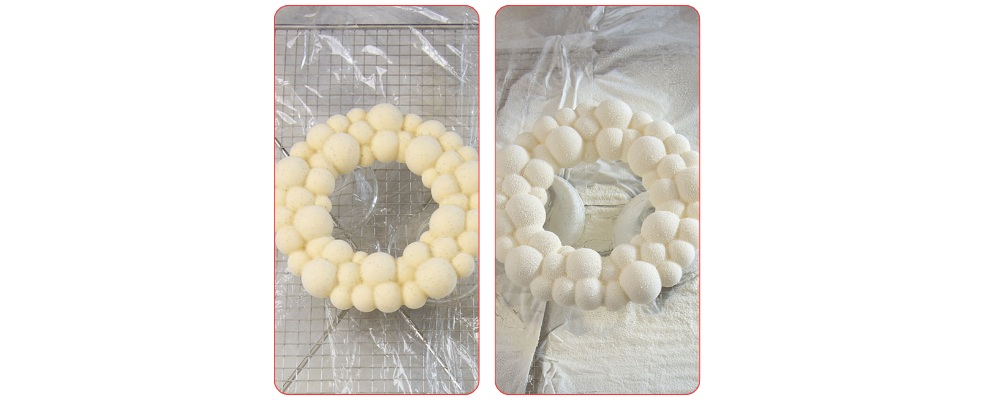
Take the Bubble Crown made of Vanilla Crémeux out of the freezer (25) and spray with Velvet Spray (26) according to the manufacturer’s instructions. Usually, the spray needs to be slightly warmed, shaken well, and sprayed from a distance of 25 cm.
 Tip:
Tip:
If you like, roll out some gum paste, cut out small stars, and dust them with silver pearl luster powder or distribute some edible silver on the Raspberry-Coconut Cake.
")
")
")
