

In the vast repertoire of Italian baking, few recipes are as fundamental, versatile, or revered as the Pan di Spagna. Known in English as the Italian Sponge Cake, this “Soft Sponge” version is the architectural backbone of countless classic desserts, from birthday layer cakes soaked in liqueur to the iconic Zuppa Inglese or Cassata.
While it might look like a simple yellow cake, the Pan di Spagna is a marvel of baking physics. Unlike American butter cakes or sponges that rely on chemical leavening agents like baking powder to rise, this traditional recipe is a “mechanical leavening” cake. Its lofty height and cloud-like texture are achieved solely through the air beaten into the eggs and sugar. When done correctly, the result is a structure that is incredibly light, airy, and absorbent—making it the perfect vessel for soaking syrups (bagna) and heavy creams without becoming soggy or dense.
This specific recipe enhances the classic formula with a secret weapon: Potato Starch. By substituting a portion of the wheat flour with starch, we lower the gluten content, ensuring a crumb that is tender, velvety, and melts in the mouth. It requires a gentle hand and a bit of patience during the mixing process, but the result is a golden, aromatic base that tastes wonderful on its own with a dusting of powdered sugar, yet stands ready to be transformed into a masterpiece with your favorite fillings. Whether you are a novice baker or a seasoned pro, mastering this Soft Sponge is the first step to conquering the Italian pastry kitchen.
🥣 INGREDIENTS
Here is the table of ingredients (Serves: 8 / For a 20 cm – 8 inch mold):
| Component | Quantity | Notes |
| Eggs | 4 (Medium) | Must be at room temperature |
| Sugar | 120 g | Granulated |
| Flour (00 or All-Purpose) | 90 g | |
| Potato Starch | 40 g | (Fecola di patate) |
| Vanilla Extract | 1 tsp | |
| Lemon Zest | 1 lemon | Organic/Untreated |
Nutritional Info: Approx. 185.31 Kcal per serving.
🥣 TOOLS
-
Electric Whisk (Hand mixer or Stand mixer)
-
2 Mixing Bowls
-
1 Baking Mold (Recommended: Anodized Aluminum, 20 cm x 10 cm / 8 x 4 inches)
👩🍳 PREPARATION STEPS (Step-by-Step)
The steps below follow the exact chronological order found in the original source to ensure they match your images.
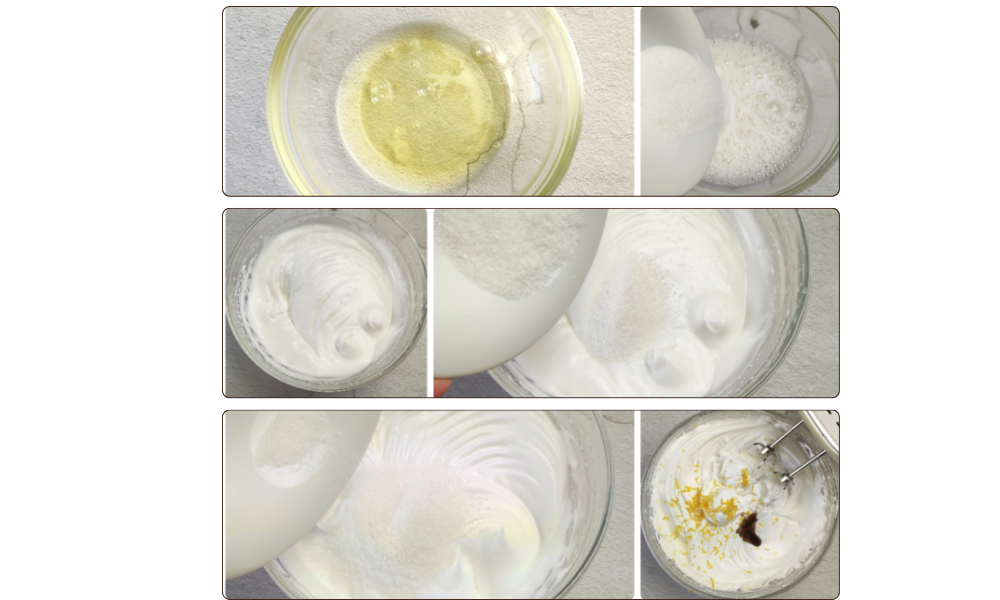
Step 1: Preparing the Eggs
To prepare the Soft Sponge Cake, the first thing to do is separate the eggs.
-
Crucial: The eggs must be at room temperature.
-
Place the egg whites in one bowl and the yolks in another.
Step 2: Whipping the Meringue
Start whipping the egg whites. As soon as they begin to turn white and frothy, add one-third of the sugar (40 g).
-
Mix for 2 minutes, then add another 40 g of sugar, mix again, and finally add the remaining sugar.
-
Goal: You must obtain a mass that is very swollen, firm, and frothy (a stable meringue).
Step 3: Flavoring
Add the vanilla extract (or the seeds from a vanilla bean) and the grated lemon peel to the whipped whites. Mix gently to combine.
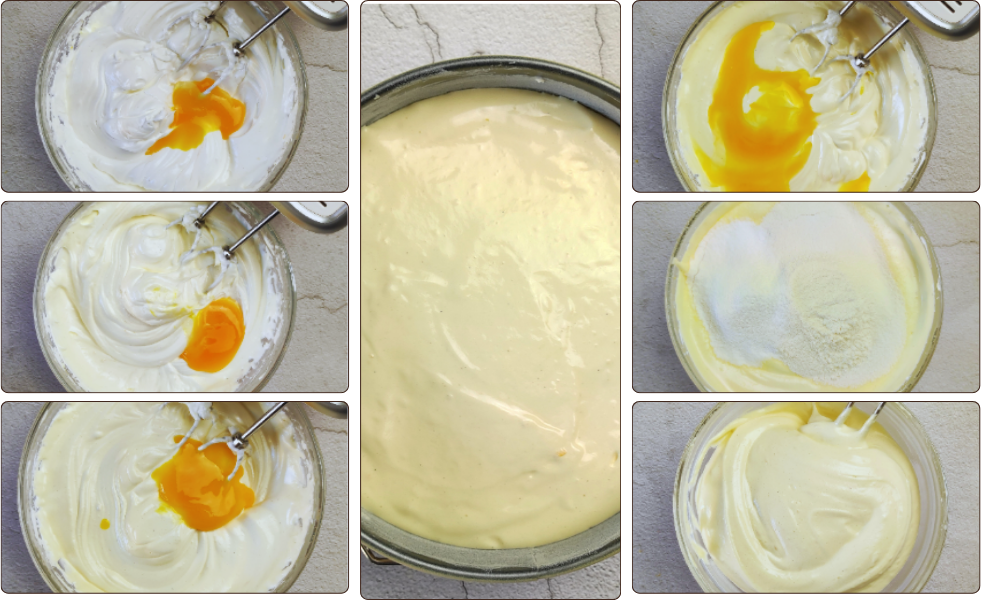
Step 4: Incorporating Yolks and Dry Ingredients
-
Add one yolk at a time to the whipped white mixture and incorporate them well.
-
Add the dry powders: sift the flour and potato starch together.
-
Using a spatula, incorporate the powders delicately into the mixture to avoid deflating it.
Step 5: Filling the Mold
Butter and flour a mold with a diameter of 20 cm (8 inches). Pour the batter into the mold and level the surface gently.
Step 6: Baking
Bake in a preheated static oven at 175°C (350°F) for 30 minutes.
Step 7: Testing and Cooling
Once the time has passed, verify the baking by doing the classic toothpick test: insert it into the center of the cake; it must come out dry.
Remove the Soft Sponge Cake from the oven and let it cool down until warm. Then, unmold it and let it cool completely on a wire rack.
Chef’s Guide & Professional Conclusion
Mastering the Art of the “Pan di Spagna”: The Secrets to the Perfect Rise
Congratulations! You have just baked the quintessential Italian sponge. While the ingredient list is short, the technique is what separates a flat, rubbery disc from a soaring, fluffy sponge. Here is a deep dive into the science and technique behind this recipe to ensure you get consistent, bakery-quality results every time.
1. The “Mechanical Leavening” Magic
You may have noticed there is no baking powder or baking soda in this recipe. This is intentional. The lift comes entirely from the air bubbles trapped in the egg whites during Step 2.
-
The Sugar Technique: Adding the sugar in three batches is critical. If you dump it all in at once, it weighs down the protein structure of the egg whites. By adding it gradually, you stabilize the foam, creating a strong network that won’t collapse when you fold in the heavy flour.
2. Temperature is Everything
The recipe specifies room temperature eggs for a reason. Cold eggs have a tighter protein structure and do not whip up to maximum volume. Eggs at room temperature (around 68-70°F / 20-22°C) whip up faster and hold more air. If you forgot to take them out of the fridge, place the whole eggs in a bowl of warm water for 5-10 minutes before separating them.
3. The Power of Potato Starch
Why use potato starch (fecola)? Wheat flour contains gluten, which gives structure but can also make cakes tough. Potato starch is gluten-free. By replacing a portion of the flour with starch, we “shorten” the gluten strands. This results in a “finer crumb” and a texture that is significantly softer and more velvety than a sponge made with 100% flour. It creates that “melt-in-your-mouth” sensation characteristic of high-end European cakes.
4. The “Fold” (Don’t Stir!)
Step 4 is the make-or-break moment. When adding the flour, do not use an electric mixer. Use a silicone spatula and move in a “bottom-up” circular motion. Cut down the middle, scrape the bottom of the bowl, and fold over the top. You want to mix just until the flour disappears. Overmixing will pop the air bubbles you worked so hard to create, resulting in a dense, flat cake.
5. How to Serve and Store
-
Soaking: Because this cake has no butter/fat, it is naturally drier than an American butter cake. This makes it a sponge in the literal sense—it is thirsty! It is designed to be soaked with a syrup (water, sugar, and liqueur/citrus).
-
Storage: Wrap the cooled cake tightly in plastic wrap. It stays fresh for 2-3 days at room temperature. In fact, it is often easier to slice into layers the day after it is baked.
By mastering this Soft Sponge Cake, you have unlocked the base for hundreds of desserts. Fill it with pastry cream, chocolate ganache, or fresh fruit and whipped cream to create a dessert that looks professional and tastes like home. Happy Baking!
")
")

